Up and running with PyTorch — minibatching, dataloading and model building
Published by: Conor McDonald
I have now experimented with several deep learning frameworks — TensorFlow, Keras, MxNet — but, PyTorch has recently become my tool of choice. This isn’t because I think it is objectively better than other frameworks, but more that it feels pythonic, intuitive, and better suited to my style of learning and experimenting.
This post provides a tour around PyTorch with a specific focus on building a simple neural network (feed forward network) to separate (i.e. classify) two classes in some toy data. My goal is to introduce some of PyTorch’s basic building blocks, whilst also highlighting how deep learning can be used to learn non-linear functions. All of the code for this post is this github repo. This is more of a practical post, if you are looking for a tour of the inner workings of PyTorch I strongly recommend this post.
To follow along make sure you have PyTorch installed on your machine. Note that I am using version 0.3.1.post2 The next version of pytorch (0.4) will introduce some breaking changes (read about them here). Also worth keeping an eye out for the release of PyTorch 1.0, which aims to be “production ready” — I’m very excited for this!.
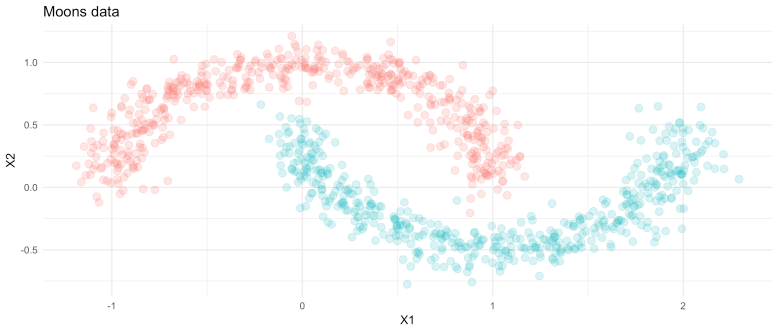
The learning task for this post will be a binary classification problem — classifying points in half moon shapes. This is a simple task for a deep learning model, but it serves to highlight their ability to learn complex, non-linear functions.
For example, if we use a logistic regression to classify this data look what happens:
| from sklearn.datasets import make_moons | |
| import pandas as pd | |
| import numpy as np | |
| import torch | |
| from torch.autograd import Variable | |
| import torch.nn as nn | |
| from torch.utils.data import Dataset, DataLoader | |
| import torch.nn.functional as F | |
| def to_categorical(y, num_classes): | |
| """1-hot encodes a tensor""" | |
| return np.eye(num_classes, dtype='uint8')[y] | |
| X, y = make_moons(n_samples=1000, noise=.1) | |
| y = to_categorical(y_, 2) |
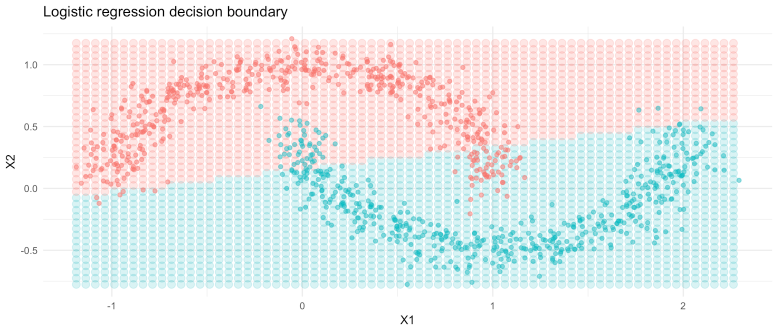
Despite applying a softmax transformation to the predicted outputs (squeezing predicted output logits to sum to 1), the logistic regression is linear in its parameters and, therefore, struggles to learn non-linear relationships. We could use a more advanced ML model for this task, such as a random forest, but then we wouldn’t have an excuse to play around with a neural network!
Before building the model, we will first create a custom data pre-processor and loader. In this example, the transformer will simply transform X and y from numpy arrays to torch tensors. We will then use the dataloader class to handle how data is passed through the model. Note that we have to define __len__ and __getitem__ methods for this class.
| class PrepareData(Dataset): | |
| def __init__(self, X, y): | |
| if not torch.is_tensor(X): | |
| self.X = torch.from_numpy(X) | |
| if not torch.is_tensor(y): | |
| self.y = torch.from_numpy(y) | |
| def __len__(self): | |
| return len(self.X) | |
| def __getitem__(self, idx): | |
| return self.X[idx], self.y[idx] | |
| ds = PrepareData(X=X, y=y) | |
| ds = DataLoader(ds, batch_size=50, shuffle=True) |
In this instance we will set-up a mini-batch routine. This means that during each epoch the model will train on small subsets (batches) of the data — that is, it will update its weights with respect to the loss associated with each mini-batch. This is generally a better approach than training on the full dataset each epoch. It is also advisable to use smaller batches — though this is a hyper parameter so do experiment!
Defining a model
The standard approach to defining a deep learning model with PyTorch is to encapsulate the network in a class. I quite like this approach because it ensures that all layers, data, and methods are accessible from a single object. The purpose of the class is to define the architecture of the network and to manage the forward pass of the data through it. To define the model we need to inherit the nn.Module.
The typical approach is to define layers as variables. In this case we define a single layer network. The nn.Linear function requires input and output size. In the first layer input size is the number the features in the input data which in our contrived example is two, out features is the number of neurons the hidden layer.
| class MoonsModel(nn.Module): | |
| def __init__(self, n_features, n_neurons): | |
| super(MoonsModel, self).__init__() | |
| self.hidden = nn.Linear(in_features=n_features, out_features=n_neurons) | |
| self.out_layer = nn.Linear(in_features=n_neurons, out_features=2) | |
| def forward(self, X): | |
| out = F.relu(self.hidden(X)) | |
| out = F.sigmoid(self.out_layer(out)) | |
| return out |
The input to the output layer is the number of neurons in the previous layer and the output is the number of targets in the data — in this case two.
We then define a class method
forward to manage the flow of data through the network. Here we call the layers on the data and also use apply the reluactivation (from torch.nn.functional) on the hidden layer. Finally, we apply a sigmoid transformation on the output to squeeze the predicted values to sum to one.Running the model
Next we need to define how the model learns. First we instantiate a model object from the class, we’ll call this
model. Next we define the cost function – in this case binary cross entropy – see my previous post on log loss for more information. Finally we define our optimiser, Adam. The optimiser will be optimising parameters of our model, therefore, the params argument is simply the model parameters.
Now we are ready to train the model. We will do this for 50 epochs. I have commented the code block to make it clear what is happening at each stage. We set up a for loop to iterate over the data (epochs) and with each epoch we loop over the mini batches of X and y stored in
ds, which we defined previously. During each of these loops we make the input and target torch Variables (note this step will not be necessary in the next release of pytorch because torch.tensors and Variables will be merged) and then specify the forward and backward pass.
The forward pass uses the model parameters to predict the outputs. In this first pass the prediction will be close to random because the parameters are initialized with random numbers. In this pass we calculate loss associated with the model using the cost function we instantiated.
| model = MoonsModel(n_features=2, n_neurons=50) | |
| cost_func = nn.BCELoss() | |
| optimizer = tr.optim.Adam(params=model.parameters(), lr=0.01) | |
| num_epochs = 20 | |
| losses = [] | |
| accs = [] | |
| for e in range(num_epochs): | |
| for ix, (_x, _y) in enumerate(ds): | |
| #=========make inpur differentiable======================= | |
| _x = Variable(_x).float() | |
| _y = Variable(_y).float() | |
| #========forward pass===================================== | |
| yhat = model(_x).float() | |
| loss = cost_func(yhat, _y) | |
| acc = tr.eq(yhat.round(), _y).float().mean() # accuracy | |
| #=======backward pass===================================== | |
| optimizer.zero_grad() # zero the gradients on each pass before the update | |
| loss.backward() # backpropagate the loss through the model | |
| optimizer.step() # update the gradients w.r.t the loss | |
| losses.append(loss.data[0]) | |
| accs.append(acc.data[0]) | |
| if e % 1 == 0: | |
| print("[{}/{}], loss: {} acc: {}".format(e, | |
| num_epochs, np.round(loss.data[0], 3), np.round(acc.data[0], 3))) |
In the forward pass we use to model to predict y given X, calculate the loss (and accuracy). To so so we just pass the data through the model. In the backward pass we backproprogate the loss through the model and
optimiser.step updates the weights according to the learning rate.
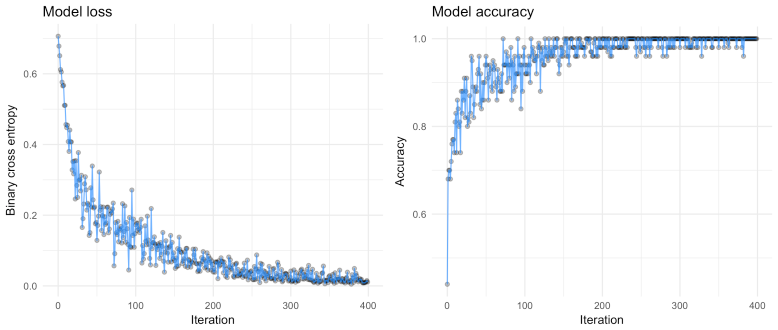
We can see that the loss decreases rapidly (the volatility can be explained by the mini-batches), which means our model is working — awesome! You can also see the non-linear decision regions learned by the model.
Also, check out the decision regions learned by the model:
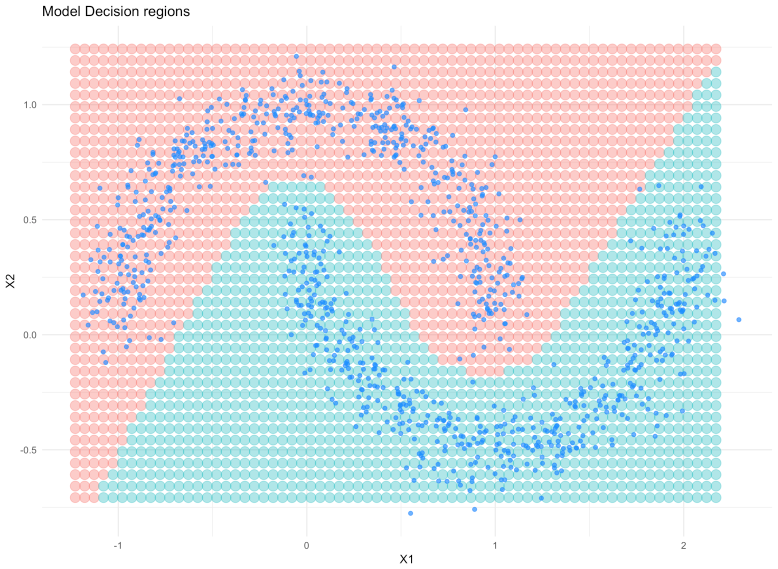
It is pretty clear that the neural network can learn the non-linear nature of the data!
No comments:
Post a Comment